Drupal Commerce is a set of modules that add flexible e-commerce functionality to Drupal 7, including features like dynamic product pricing and display, a customizable shopping cart and checkout form, and an administrative back end powered by the Views and Rules contributed modules. The core Commerce modules make very few assumptions about your business rules, allowing you to create a build-to-suit e-commerce application.
Every bit of the front and back end can be customized, including product displays, the shopping cart block and form, checkout pages and form components, and administrative interfaces. Additionally, you can use Rules to configure everything from discounts and taxes to payment methods and automated order processing.
As with Drupal itself, the flexibility of the Commerce modules means they can be used for a wide variety of e-commerce applications, but it also introduces a level of complexity that will challenge new users. While the project roadmap includes user interface improvements over the coming year, some of the complexity is already addressed by installation profiles and contributed modules that simplify specific aspects of store configuration.
Building Product Displays
One of the most complicated things you will encounter when building a new Drupal Commerce site is product display configuration. Products are entities with intrinsic product ID, SKU, and title properties, as well as default price fields. They can be further customized using any number of product types and fields.
You can easily create products with the administrative interface, but your products will not be automatically visible to users on the front end. Drupal Commerce separates the definition of a product from its display, allowing you to build custom displays using the tools the project provides such as the product reference field.
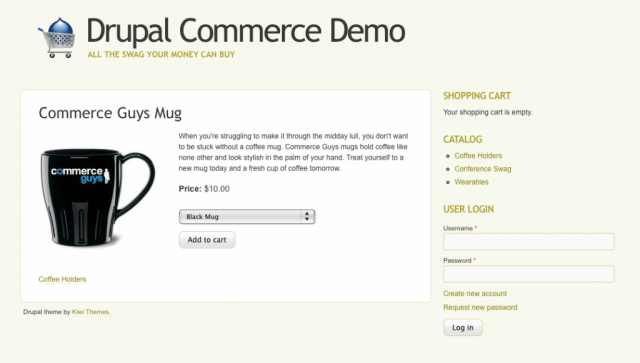
The Drupal Commerce demo site uses a product reference field on a custom content type to display products for sale.
This separation lets you display the same product in any number of places without worrying about data synchronization between the displays, a common problem for multilingual sites and multi-domain stores. It also lets you easily build displays referencing multiple products. Even so, you can still directly display product data through other means such as Views and Panels.
The simplest product display on most e-commerce sites is a page that sells a single product or group of closely related products, such as different sizes of the same t-shirt. To accomplish this you create a product display content type with a product reference field using the following steps.
1. Download and install the Commerce modules.
To install Drupal Commerce, you must be running Drupal 7 along with several other dependent modules: Addressfield, Chaos tool suite, Entity API, Rules 2, and Views 3. Links to these dependencies along with the latest version of the Commerce modules are available on the Drupal Commerce project page at http://drupal.org/project/commerce. You should install every module in the Commerce package for the purpose of this tutorial and for your own exploration.
2. Create a product.
The Product UI module creates a basic product type during installation that you can use to create a product for sale. From the Administration » Store » Products page, click the Add a product link. Give your test product a title, SKU, and price and then save the form. You can add as many products as you want, adding additional fields for product images and product type specific details if you are familiar with the Field UI.
3. Add a product display content type.
From the Administration » Structure » Content types page, click the Add content type link. Give it the name Product display and a simple description such as, “Use product displays to present an Add to Cart form for products to your customers.” The name of this content type intentionally reinforces that this is purely a point of display for a product, not the product definition itself. Customize the other content type settings as you see fit and submit the form using the Save and add fields button.
4. Add a product reference field.
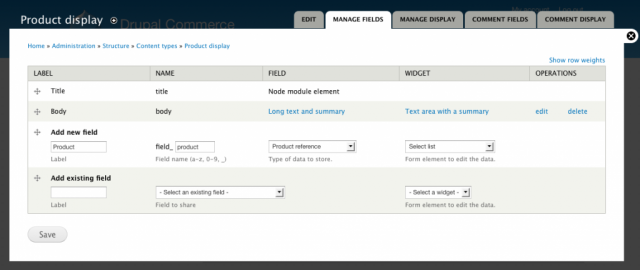
You are now viewing the field management interface for the Product display content type. The default fields listed include the Title and Body. Use the Add new field row in the table to add a product reference field, entering Product as the label, product as the name, Product reference as the field type, and Select list as the widget.
Use the Field UI to add a product reference field to the new content type.
Submit the form using the Save button to proceed to the field settings form. You do not need to change anything in the next two settings forms for now, so submit them and move on to the next step.
5. Configure the field display settings.
Click on the Manage display tab to configure how fields are displayed for this content type. There are two important things to notice. First is that there are additional fields listed on the display tab that did not appear on the fields tab, namely the product price field and any additional fields you added to your product type.
The content type display settings include fields from referenced products.
Fields from any referenced product can be displayed alongside fields from the content itself using the product type’s field display settings to determine the label and formatter settings. When you reference multiple products, the fields displayed on the page automatically update to match the product currently selected on the Add to Cart form. This allows you to have dynamically updating product prices and images without having to write any custom JavaScript.
You should also notice that the Add to Cart form display formatter has a couple of settings to adjust the visibility of the quantity widget and the default quantity to add to the cart.
6. Create a product display.
Now that you have everything configured and a product already created, you can browse to Administration » Content and add a product display using the Add content link. The Title of the display should likely match the title of the product, and you can use the Body to add a full product description. Once you save the product, it will appear with an Add to Cart form that you can use to purchase it, netting your fledgling store’s first ever sale!
Where to go from here?
This tutorial gets you to the point of listing products on your Drupal Commerce site so you can start testing and developing against further features, like the shopping cart and checkout form. However, there are other intricacies of product displays to learn, including Rules based discounts, tax-inclusive price display, and attribute selection on the Add to Cart form. Documentation on these features and more is under active development at the project’s homepage at http://www.drupalcommerce.org.
Additionally, you can use installation profiles like Commerce Kickstart to get up and running quickly with some of these basic configuration steps already done for you. The goal of Drupal Commerce is for future installation profiles to be developed for specific use cases or business models. Follow along as these exciting projects develop and contribute where you can to help us make Drupal the world’s greatest open source e-commerce platform.
