The Salesforce Suite of Drupal modules is an easy way to connect Drupal to Salesforce, a Customer Relationship Management system used by retailers and non-profits alike, which allows non-technical staff to create extensive reports – reports that would be difficult to create using Drupal alone.

Although entities can be synchronized to Salesforce objects – and custom mappings created – there is lots more that can be done with Salesforce. Let’s take a look.
Getting started
For openers, you’ll need:
- A Developer Edition account;
- The Salesforce Drupal module;
- A Drupal development site.
To get the Developer Edition, create a developer account.
Once you’re in Salesforce, you’ll quickly notice that the site seems overwhelming. A complete overview is way beyond the scope of this article; the most important objects for our purposes are Campaigns, Leads, Contacts, and Cases.
There are many other extensions for Salesforce, extensions that provide new object types. Also, existing object types can be extended in much the same way as in Drupal.
As a best practice, always work in a sandbox environment when not working within a dev instance. It will help ensure that you can create a proper development -> testing -> production workflow.
To create a sandbox (Enterprise, Performance, Unlimited, and Database.com), go to Setup » Sandboxes » Create new Sandbox.
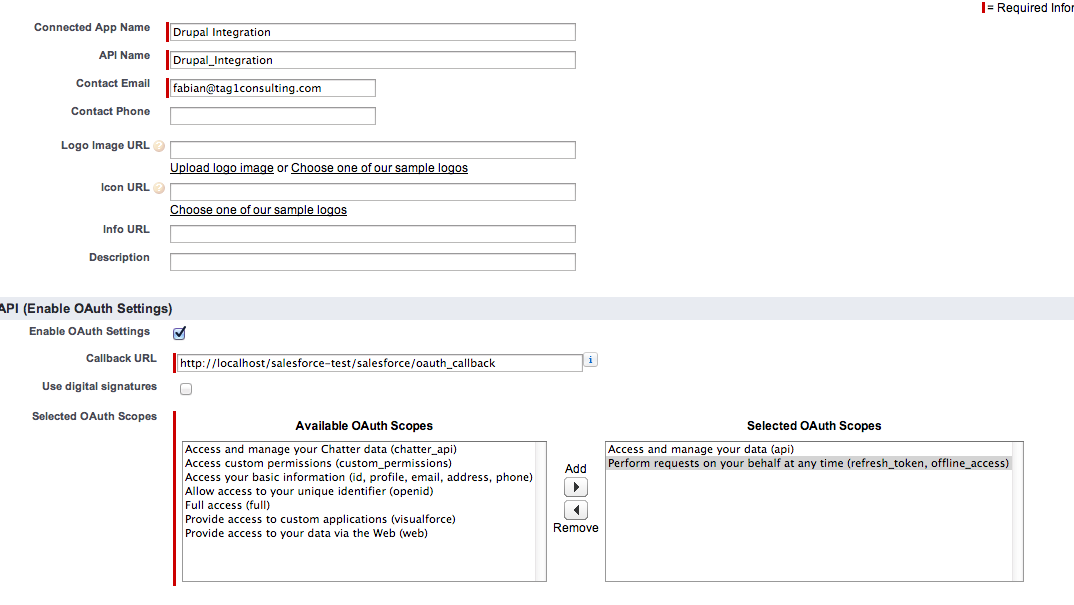
As the final step in this first part of the process, create an application to connect Drupal to Salesforce by going to Setup » Create » Apps and clicking on New application under Connected Apps. Enter the basic information (e.g. “Drupal Integration”) and activate oAuth. Enter a callback URL to your local instance. If your local development Drupal site resides at http://localhost/salesforce-test/, then your callback URL is http://localhost/salesforce-test/salesforce/oauth_callback. Select api and offline_access as scopes.
Figure 1: Creating an app in Salesforce is easy, but be certain that the oAuth callback URL is correct.]
Be sure to keep your consumer key and consumer secret handy, and you’re ready to move on.
Next Steps
Download the ‘salesforce-7.x-3.x’ module and enable the salesforce_mapping and salesforce_push modules. In your Drupal site, go to Configuration » Salesforce » Authorize and enter your consumer key and consumer secret.
If you are using a sandbox, you need to enter under the advanced settings, <a href="https://test.salesforce.com/">https://test.salesforce.com/[/geshifilter-code] as the Salesforce endpoint. After logging in, you will be prompted for the permissions specified earlier; after clicking ‘Allow’, you’ll be back at Drupal with the message “Salesforce OAUTH2 authorization successful.” At the bottom of the screen will be a list of resources.
Before mapping the user object, create field_first_name and field_last_name fields within Drupal for the user entity at Configuration » People » Account Settings » Manage Fields.
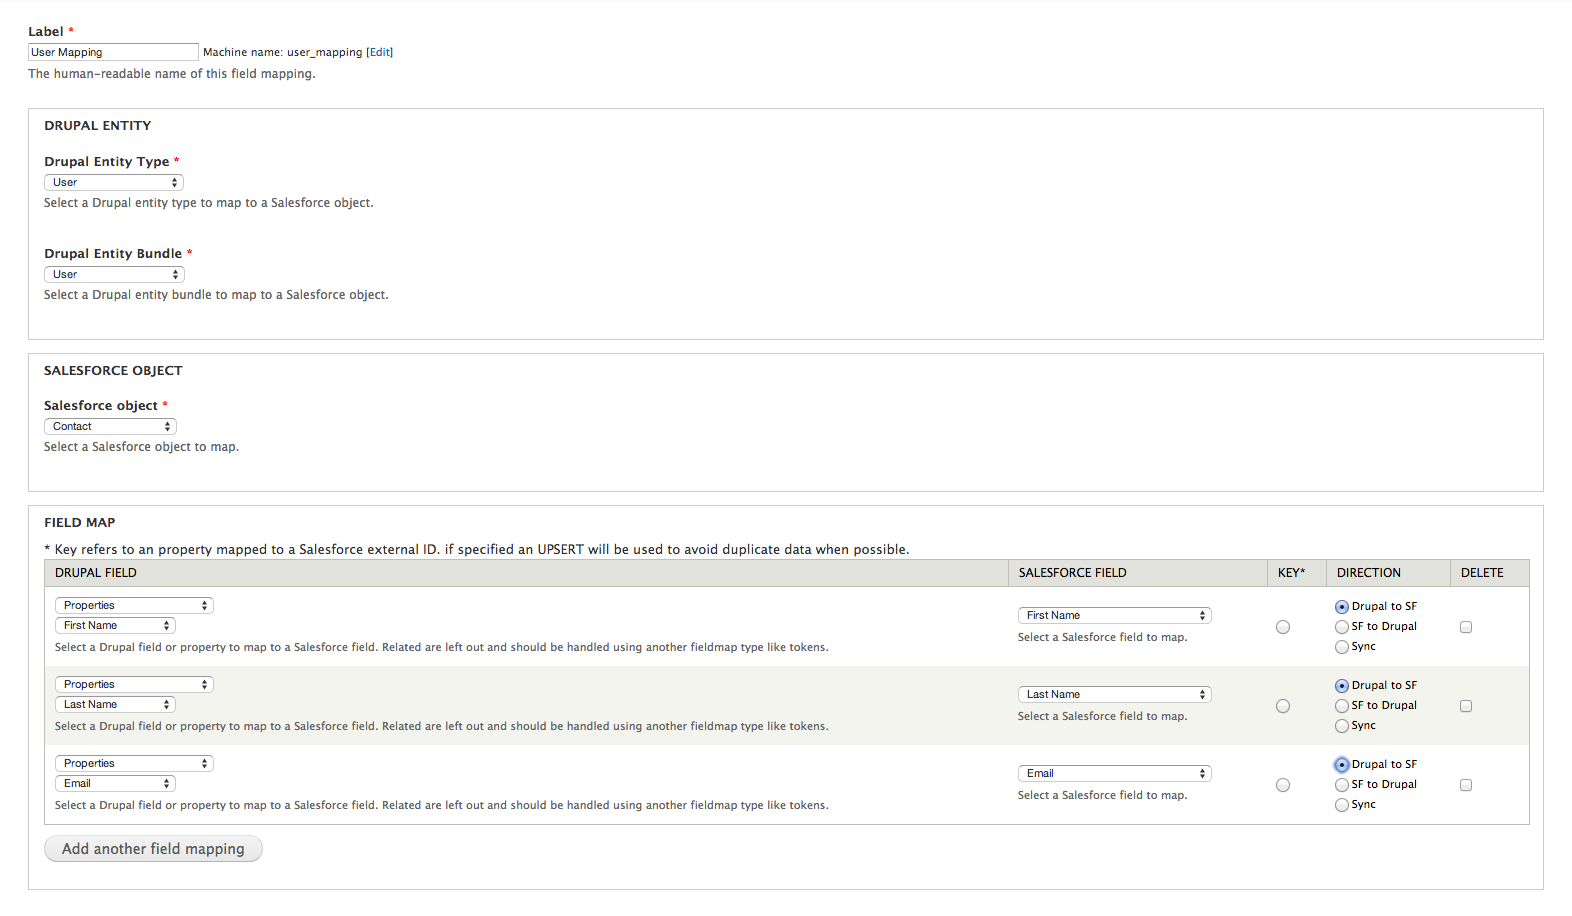
You’re now able to map the User account to a contact by going to Structure » Salesforce » Salesforce Mappings and adding a Salesforce module called “User Mapping”.
Fill out the fields as seen in Figure 2, and check the three action triggers (entity create / update / delete). Save, and edit your own user account at People » Edit. Add the first name and last name, and you’ll see that the user account has been synchronized with a Salesforce record.
Figure 2: Salesforce module allows you to map all Drupal entity bundles to different Salesforce objects. Here, the user entity is mapped.
A Ticket System for Authorized Users
A typical use case is to collect data in Drupal, and then process the data in Salesforce. But for this article, we will create a quick ticket system for authorized users that will create cases within Salesforce, using the entityform module, which allows creating forms that can be used for collecting data – similar to webform, but using Drupal fields.
Download and enable the entityform module and go to Structure » Entityform Types » Add entityform type. Enter Ticket as the name, and select authenticated user as the role. Save the form type and add a message-long text field to it.
Next, map the entityform submission entity with the ticket bundle to a Salesforce case object like the user account. Map the field_message field to the Case description; map the user who creates the case; select Related Entities » User; and map that to Contact ID. (See Figure 3.)
Figure 3: Related entities allow advanced scenarios for mapping complex relations in Drupal directly to Salesforce.
Save the mapping and go to the /submit/ticket URL (available from the Structure » Entityform types screen), enter a message, submit it, and – voila! – your ticket has been created as a case within Salesforce.
Tip: If you copy the Salesforce ID from the message, you can go directly to https://emea.salesforce.com/ID to see the newly created record. (The emea prefix is for the developer edition.)
Webforms
While entityform is quite powerful, form variations are not easily workable because only one bundle can be mapped to one object type. But with the help of the ‘webform’ and ‘salesforce_webform_map’ modules, in combination with entityform, it is possible to create a Salesforce mapping per object-type once, and potentially re-use it across hundreds of different web forms. In this scenario, one webform is represented by a campaign in Salesforce, and recursive object creation is enabled using different Salesforce mappings.
Conclusion
Salesforce and Drupal are a powerful combination. The Salesforce module allows you to map complex Drupal structures to Salesforce, and by using entityform, simple data entry forms can easily be created.
Image: "Rolling Start: WEC" by _chrisuk is licensed under CC BY-NC-ND 2.0


